Showing posts with label Recycled. Show all posts

Thursday, June 20, 2013

INSECTS- Upcycled!


This Spring it was hard to walk anywhere in my neighborhood without seeing THIS


We were overrun by the 17 year cicadas coming up to say hi, loafing on our plants, enjoying the sun and making my dog very very full. Depending on how you feel about cicadas this was either a good time to hide in your homes or to venture forth as the local welcoming committee. At my house we welcomed them with open arms (or in the case of my mini-schnauzer, open mouth.)

So it was only natural to turn to art as a way to honor the little guys. Of course the 5-6 year old class preferred butterflies. Close enough! I got to use up my lemon juice containers to make insect bodies and we added little pieces of hardware and pipecleaners and cut cardstock wings. Sharpies work wonders on carstock. The insect goggles (thank you to my friend Eileen who donated a bunch of avocado cartons) were more free-form-insect-style. 


Pipe cleaners made great legs, antena, and even proboscises, their tubelike feeding structures!


 In any event, it was a really fun project and all the insect artists had great time! Aren't you impressed that I didn't try to make any insect puns? 


Saturday, March 9, 2013

SPRING: BRING IT ON!

One of the many beautiful
birdhouses created by the Young At Art Artists
I am really a big fan of Spring. It's a great season. It looks good, it feels good, it smells good. Plus it ushers in the start of the best time of year of all: Garage Sale Season. (I'll admit it. I'm an addict.)

I start getting excited about Spring pretty early on. Probably around November I'm already thinking about garden gnomes and wondering which of my garden flowers will get confused and push to the surface first. (This year the daffodils won--one fluke of a warm day and they were half-way up by mid-February.)

In Picasso's Basement's YOUNG AT ART CLASS (for 4-5 year olds) we are already getting ready! The young Artists took recycled cereal boxes and painted bird houses on them. I helped them holes in the front for the bird entrance. We glued the paintings to cigar boxes that had the lids removed. The Artists painted corks and drew in eyes and beaks to create birds and then glued them to popsicle sticks perches that we attached. They were so excited by their creations that they continued painting beautiful Spring scenes!


Anyhow, this is just a quick post to say HAPPY PRE-SPRING!  

Tuesday, January 1, 2013

A Cheery 2013 to You All

I don't consider myself to be superstitious  but I do love the number 13 and I'd like to think that it's my "lucky number". I've had a surprisingly number of happy events occur on Friday the 13ths and so I would looooove to hope that the year 2013 will be a wonderful year. For all of us. I suppose my ancestors from the old country would think that I was tempting fate by voicing this hope. So when I'm done blogging I'll go throw some salt over my shoulder and find some wood to knock.

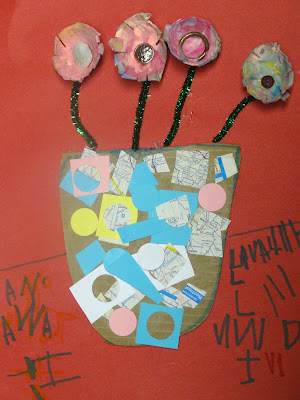
A nice way to welcome in the New Year is some bright cheerful flowers. And nothing says cheery like flowers created by my 4-5year old class. Toss in some bright colors and recycled objects and you have the makings of some uplifting artwork.

 I had the young Artists select colored papers and create vases from card stock. I wanted them to draw the vases themselves and cut them out themselves. They often want me to cut items for them but, darn it, these are skilled Artists and they need to recognize that they can control those scissors!

I showed them paper with low-key colors: cut up paper, ripped up vintage maps (which have lovely pastel colors) and plain paper. I gave them scissors and paper punches to make shapes. Some chose the punches, others went to town cutting and ripping. They used these to collage their vases. Then they placed their vases against some high-key colored backgrounds. They chose bright red and blue. They painted cut up cardboard egg cartons in low key colors to match the vases and glued the vases and flowers down on the paper. Then they chose recycled objects to fill the flowers: buttons, shells, etc.

I explained that it would be nice to place their flower vases in space rather than have them float around and they all drew in a horizon line or table top. They were then able to "decorate" their tablecloths. Most chose to use marker although one Artist glued down buttons. Didn't they do a wonderful job?


A HAPPY AND PEACEFUL NEW YEAR TO YOU ALL! 

Now off I go to find some salt to throw and wood to knock on. 


Wednesday, November 28, 2012

MORE Face Jugs!

Before painting
In a previous post I shared our Face Jug project made from recycled jars and clay. The artists worked really hard on them. They were so incredibly varied and whimsical. Some were a little crazy looking, which is pretty appropriate considering how insane traditional face jugs can be.
 Here's a few more to share with you all. 
Enjoy!

Face Jugswaiting for their glaze to dry.
Add caption


Still to be painted.
Whiskers were made from
paper clips. 


Sunday, November 25, 2012

Face Jugs and a Hurricane

Last night I dreamt that a nasty hurricane hit the East Coast, knocking out power, taking down wires, leaving people cold and cranky and bored and hungry. And then I woke up and remembered that it all was real. Such a crazy time and this Thanksgiving I had to be thankful that the worst that happened to my family was losing heat and power and having our schools closed. We were cold and bored but we had friends that lost property, faced terrible cleanups, were left temporarily homeless. Many people lost their homes, their cars, and were left in terrifying situations. I'm truly grateful that my family remained together, safe and secure.  I'm also grateful for the workers at the utility companies, the townships, and the volunteers that are still working trying to help get everyone back in their home

Last week my kids finally returned to a full week of school. And as I clean out my studio and straightened up my supplies (which, being in the basement, all ended up on top of my work tables to protect them from any possible flooding) I've found many projects that I should share.

I always like to break up my posts so I'll share one with you all here and post more later. 


So let's talk about FACE JUGS.

Jugs and urns with faces on them can be found in many cultures going all the way back to the ancient Greeks and the Egyptians. They were often crafted by African American slaves in America and there's speculation that they were used almost as a burial memorial because slaves were not allowed proper funeral markers. They later became a common American folk art. They are often grotesque or goofy and sometimes feature human teeth!

The Picasso's Basement artists looked at many pictures of the jugs. They each chose a recycled glass jar or bottle to work with and a big ol' hunk of Prang Das Modeling Clay which is  a little pricey but excellent because it doesn't crack and crumble like most air-dry clay. (Just see my Terra Cotta Warrior post to see what disasters await when you use the wrong clay.)

Zombie Pig Pencil Holder Face Jug/Front
They painted them with acrylic paint and later glazed them with Modge Podge.
Zombie Pig Pencil Holder Face Jug with 2 tails/Back


I always encourage the Artists to just go to town with their imaginations. I think you will see that they certainly did! I'll feature some more of them on my next post. 

Sunday, June 10, 2012

Riddle me this, Batman!

I got one for you.


Q: What does a vinyl Thompson Twins album, a Barbie doll shoe and an egg carton have in common?

Give up?
A: I can use them ALL as art supplies!`


I have many generous friends who have literally kept Picasso's Basement going by supplying me with their refuse. Several parents of Picasso's Basement students recently asked what else the art room could use. My list is long and everchanging but I've done my best to put together a current list. If you have anything listed that you'd like to contribute or you have something new (or old) and exciting that you think you'd like to pan off on me donate, please drop me a line!


  1. Clear square CD Cases. Really. With or without enclosed CD
  2. Egg Cartons (Plastic for great paint trays, styrofoam/cardboard are saved for crafts)
  3. Bubble Wrap (the small bubbles, not the big ones)
  4. Rounded small Applesauce/Fruit containers 
  5. Extra craft supplies you're getting rid of! (Wait! Why would you get rid of it?! Well, IF...)
  6. Old maps
  7. Buttons
  8. Pencils 
  9. Erasers
  10. Wooden frames
  11. Plywood Scraps (big enough to cut into small signs with a jigsaw)
  12. Printer paper
  13. Vinyl albums and singles (do you remember these?)
  14. Bottle caps. (Yes. Still.)
  15. Laundry detergent bottles, preferably brightly colored ones
  16. *Teeny tiny toy pieces (Gumball machine items, Polly Pocket dolls and accessories. Letter blocks etc.)
  17. Old magazines for cutting up.
  18. Things with weird textures. (I know. It's vague. Use your imagination. Have a strip of mesh food baggies? It's fantastic for printmaking!)
  19. Art books
  20. Art posters
  21. Lampshades
If you want to know what the teeny toy pieces are good for take a look at this fabulous piece created by one of my Middle School students:

Assemblage ala Louise Nevelson

And if I haven't said it enough, THANK YOU! THANK YOU! THANK YOU  to all of those whose generous contributions have kept my art program going! 


Tuesday, March 13, 2012

We Built This City On Rock and Roll...and we Recycled Too!


Mutant Schnauzer Attacks City!


OK. Not really. This is, of course a teaser about the latest Picasso's Basement project.

In all my time of teaching Picasso's Basement classes the most popular project ever was my Russian Byzantine Architecture  project when the artists created a Byzantine inspired cathedral out of recycled food boxes, cups, plastic and styrofoam. It has been the most requested project by all the artists here. They worked together to form one big building which now sits in my art studio. It taught them a little bit about Russia, architecture, recycling, and mostly teamwork. 


And so it begins....


I wanted them to learn more about all styles of architecture and since we are so close to New York City I knew the kids would really get excited about this. 

I started by saving all sorts of interesting boxes, cans, tubes and containers. I painted them white and tossed them in a giant crate. The students have to pick through to find what they think will work to help them best represent the buildings' architectural elelments. 

There will be more to come of this project in the next couple of weeks as I have two groups of artists working on this, each group working for 2 weeks. 

Taking a break. After all, the Empire State Building
wasn't built in a day!

Hard at work on the Guggenheim Museum


So far the students have learned about many kinds of architecture including:

  • Art Deco (Empire State and Chrysler Buildings)
  • Renaissance Revival (Flat Iron Building)
  • Beaux-Art (Washington Square Arch, Main Branch of the NYPublic Library)
  • Gothic (St. Patrick's Cathedral)
  • Post Modern (the Lipstick Building)

Plus they have mastered how be inspired without creating an exact replica and, most importantly how to make the most out of an empty fruit container!

So stay tuned please! There will be much more to come!

Oh, and don't forget to vote for Picasso's Basement at
2 days of voting to go!


Wednesday, March 7, 2012

Lame Post (or THIS is your child's valentine's box???)

That's right. It's time for the LAMEST posting.
I have a cold.
I am tired.
And so rather than showcase my wonderful students' artwork I will instead attempt to inspire you with just my own lame craft.

Every year at least one of my 2 children has been asked to decorate a box for valentines day so that at school the other children could fill it with tiny purchased cards. I've purchased those cards myself. You know the kind--the cheap ones that rip a little when you try to separate them and then get stuffed into teeny envelopes that don't stay properly closed. Well, that's the route I usually go as well.

But now I'm an art teacher. I have to raise the bar. I have  a standard to uphold.

This year I decided we'd do it all by hand. Inspired by our new schnauzer we made schnauzer cards. We printed out photos of the dog and pasted them on red paper and cut them to the shape of his head. When recipient of card opened them they found a dog tongue holding a cheapo piece of chocolate. (You know, the waxy kind you get in bags this time of year at the pharmacy.) I would love to show you one but I we gave them all away. Although we did keep some of the cheapo chocolate...

We also made an excellent box to resemble our schnauzer.

Real Schnauzer. Do not confuse with dog box. Do not feed valentines cards.
 It was made out of a shoe box, and two smaller boxes. (I think one was from a pot pie.) We cut a hole in the top boxes so that you could "feed" your valentines into the dog's mouth.

Valentine's Box that is virtually identical to real dog. Can you tell the difference? NO!
Open mouth, insert cards.


That's right. My son's Valentines Box actually eates valentine cards. Pretty cool, huh? Apparently the class loved it.

Am I going to wrap this up with a clever or wise comment?

Heck no.  I'm taking 2 NyQuil and going to bed. Wake me when it's St. Patty's Day.

Friday, February 24, 2012

Cigar Box Showstoppers

I can't believe I forgot to blog about this project with the 6-7th Grade Picasso's Basement Artists. This dates back to November I think.

I had toyed with doing a particular project based on the art of Joseph Cornell who created beautiful delicate assemblages within boxes. 
OK, I know I should have added a real Cornell photo here but this kept you reading, right?


Traditional Retablo


I also wanted to eventually do a project based on Mexican retablo art, devotional paintings often within a wooden box or frame to create a home alter. A recent trip to a wondrous cigar store left me only $25 poorer while I carted home 40+ stunning cigar boxes. I realized they would come in handy someday and I found the perfect project. I thought I'd wait on the Cornell and focus on the retablos.

But once I let the students loose in my art room, complete with old magazines, shells, vintage bottle caps, antique cards, little wooden findings and boxes of old door knobs, they let their imaginations take over.

I'm sorry to say I only have pictures of 2 of the boxes but they are pretty incredible!


Glad being a craft-material hoarder has finally paid off for someone!


Tuesday, September 6, 2011

Russian Architecture

Russian Architecture: Day 2 of Art Camp

Time to recap another day of my first Picasso's Basement Art Camp.

On the second day of art camp we traveled to Russia. We looked at Russian architecture, some of which is noted for it’s Byzantine influences. Many of the more famous structures feature onion domes, bold colors, and arches. Working with only recycled items (shoe boxes, food boxes, paper towel rolls, and soda bottles) and some plastic baseballs covered with Paper Mache the artists began to paint patterns with craft acrylic paint. When it dried later they became architects and worked as a group to assemble their structure with I helped them glue together with a hot glue gun. VOILA!

Russian Building
Snacks were just sad that day. The children helped me bake (what should have been) delicious Russian teacakes. Unfortunately, I’m not Julia Child and I measured the flour incorrectly. They smelled delicious but they looked like this:
Bad Teacakes

Good Teacakes
Luckily I had a little of the batter left and I added some more flour. The next day we were able to enjoy them.

Nesting dolls were the next order of business. I used manila cardboard to cut out the shapes of nesting dolls and the children made all sorts: animals, constellations, and EEEK! serial killers (because when you don’t watch the kids as you clean up, those pop-culture themes just creep right in!)  But I won’t bother showing them here. The kids had fun with them but truthfully a good part of their energies that day were used on the Byzantine building. 
Lesson learned: One good project is all anyone needs!